Description


![]()

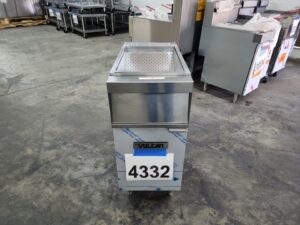
Model: PDC-14
BKI Oil Transfer Station Portable Fryer Oil, 120v
New – Considered Scratch & Dent, tested perfectly
BKI Oil Transfer System PDC-14 System Product Details
- Set-up suction from deep fryer pump system
- Storage tank 13 gallon capacity
- Switch pump to discard stored oil
- 120V power required
- 30″ deep x 15-1/4″ wide x 40″ tall
Power Required: 120V
Other on-line dealers price: $2,750.00
Free Shipping with lift gate service to continental united states businesses – Please be aware the product will ship by freight carrier in a full size tractor trailer and will need room to get in and out or to turn around.
BKI PDC-14 Oil Power Disposal Caddy System Information
Extracting Renderings from an Oven Drawer
Ovens Equipped with Extraction Drawer and Coupler Nipple
1. Open the oven door and move the Disposal Caddy into position near the oven.
2. Lock at least (2) of the casters on the Disposal Caddy.
3. Plug the Disposal Caddy power cord into a 115V receptacle.
4. Put on high temperature gloves and any other protective equipment prescribed by your employer.
5. Move the Bypass Valve handle to the Onboard Pump position.
6. Connect the coupler on the end of the Disposal Caddy’s long hose to the nipple on the oven
Drawer. Make certain the coupler is fully seated on the nipple.
7. Move the Disposal Caddy Power Switch to the Extract position. The pump will start, suctioning
out the contents of the Drawer.
8. When the Drawer has been emptied move the Disposal Caddy Power Switch to the center Off
position.
9. Disconnect the Disposal Caddy hose coupler from the oven Drawer and stow it in the cup in the
onboard tank.
10. Unplug the Disposal Caddy power cord and stow it on the hanger on the back of the unit.
11. Release the caster brakes and move the Disposal Caddy to its storage location.
Ovens using the accessory Hand Wand
1. Open the oven door and move the Disposal Caddy into position near the oven.
2. Lock at least (2) of the casters on the Disposal Caddy.
3. Plug the Disposal Caddy power cord into a 115V receptacle.
4. Put on high temperature gloves and any other protective equipment prescribed by your employer.
5. Move the Bypass Valve handle to the Onboard Pump position.
6. Connect the coupler on the end of the Disposal Caddy’s long hose to the nipple on the Hand
Wand. Make certain the coupler is fully seated on the nipple.
7. Move the Disposal Caddy Power Switch to the Extract position. The pump will start.
8. Use the Hand Wand to suction out the contents of the Drawer
9. When the Drawer has been emptied move the Disposal Caddy Power Switch to the center Off
position.
10. Disconnect the Disposal Caddy hose coupler from the Hand Wand. Stow the hose coupler in the
cup in the onboard tank.
11. Unplug the Disposal Caddy power cord and stow it on the hanger on the back of the unit.
12. Release the caster brakes and move the Disposal Caddy to its storage location.
Discharge Fryer Oil into the Disposal Caddy
Transfer the oil from only one (1) fryer at a time into the tank. Completely discharge this oil from the
Disposal Caddy tank before transferring additional oil.
1. Open the fryer door and move the Disposal Caddy into position near the fryer.
2. Lock at least (2) of the casters on the Disposal Caddy.
3. Plug the Disposal Caddy power cord into a 115V receptacle.
4. Put on high temperature gloves and any other protective equipment prescribed by your employer.
5. Move the Bypass Valve handle to the Fill From Fryer position.
6. Connect the coupler on the end of the Disposal Caddy’s long hose to the nipple on the Fryer
filtration system. Make certain the coupler is fully seated on the nipple.
7. Start the Fryer filtration system to pump the oil into the Disposal Caddy onboard tank.
8. When the oil has been transferred to the Disposal Caddy turn the Fryer filtration pump Off.
9. Disconnect the Disposal Caddy hose coupler from the Fryer and stow it in the cup in the onboard tank.
10. Unplug the Disposal Caddy power cord and stow it on the hanger on the back of the unit.
11. Release the caster brakes and move the Disposal Caddy to its storage location.
Packaging Equipment
L&D Appliance will package the items you purchase for free. This will be strapping the item to a wooden pallet, installing cardboard or cardboard corners and shrink wrapping the product.
Warranty of Products
All Vulcan and Wolf equipment are purchased as-is-where-is and do not carry the factory warranty. L&D Appliance does offer a 10-day warranty after the product has been installed. The installation needs to be by a professional that can set-up and install the equipment properly. Installation receipt and date will need to be provided for installed equipment for L&D Appliance to honor the 10-day warranty. Parts will be provided by L&D Appliance along with your local tech support for repairs.
Returns
Buyer has 15-days to return an item if they are not satisfied or purchased accidentally, the buyer is responsible for crating and shipping the equipment back to our warehouse in SC. Once the equipment has been inspected, L&D Appliance will process a refund less any damage, missing component cost, initial shipping cost (actual cost of original shipment even on free shipping promotion) and a 15% restock fee.
Delivery Inspection Required
Insure to inspect delivery for any significant damage caused by the freight carriers. If any major damage, please contact Alan 828-527-2241 before driver leaves. If severe damage, refuse delivery. If slight damage, insure driver notes damage before leaving. The is critical, because without documentation the freight company will not accept a claim for the damage and the item delivered will now be the responsibility of the recipient for repairs.